Patchwork Bottles

I like working with glass because of its sparkling transparency. Even when covered up, as I’ve done with these bottles, it’s still exciting to feel the heftiness of the glass in my hands.

I had thrown so many bottles away that I put my foot down and declared I’m going to find a quick, decorative technique so that I can salvage these bottles.

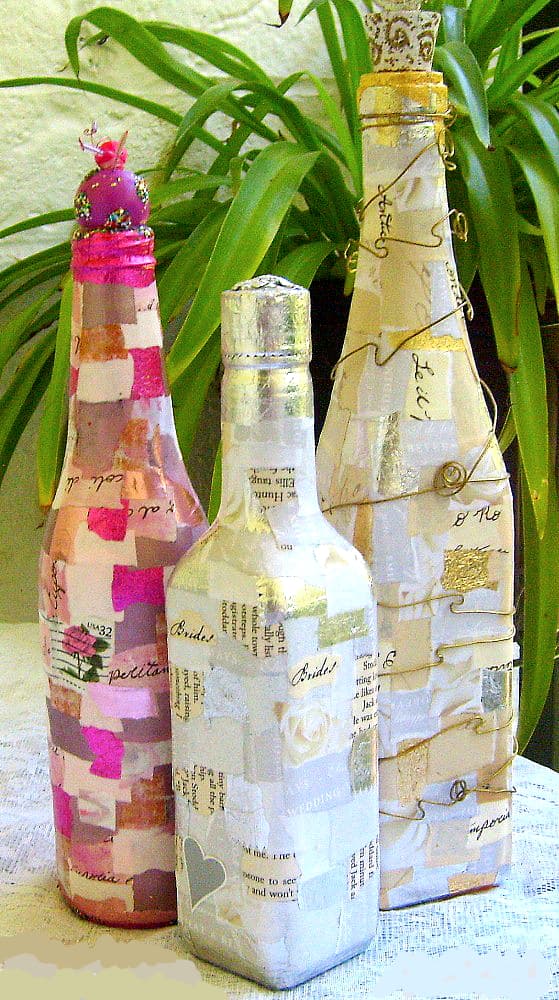
Before I tore up my papers, I decided on a color scheme of:

  • whites/creams/silvers for the 1st bottle,

  • pinks/mauves/fuchsias for the 2nd,

  • and golds/silvers/cremes/whites for the 3rd.

Once I tore up a supply of various papers, it was easy to apply glue to each piece and stick it to the bottle. I started from the bottom and worked up to the top of each one. Once finished, I painted each bottle with a matte sealer.

I decided to add another fav medium, craft wire, to the largest bottle. I chose a golden wire and twisted a design with wire pliers as I wrapped it around the bottle. I crimped each end back onto the wire, securing it.

I painted and embellished a wooden ball for the top of one bottle, attaching it securely with tacky glue. I kept the black, plastic, twist-on cap on the silvery bottle, decoupaging it with silver paper. I then formed a sculptural design on top of the cap with another piece of the paper and glue.

I really like my design for the cork stopper that I used for the gold and silver bottle. I painted it with a spiral design and glued it into the top of the bottle. I created a sculptural topper for the bottle cork out of reclaimed metal, wire and beads. The metal disk had a metal post on it (it was part of an old pierced earring), which I stuck into a glue-filled hole in the cork.

Metallic Patchwork Bottlese

The most time-consuming part of this technique is, of course, designing the paper patchwork design. Once you get started it goes very quickly.

I like my work to be finished on all surfaces, so I cut and glued craft felt to the bottom of each bottle. It helps keep them from sliding off of shelves and protects surfaces.

I like looking at these bottles. They dress up any table or shelf with a pretty flash of creativity. Thanks for looking. :bouquet:

@AudiobookLover

16 Likes

These came out really pretty! How smart to choose a color palette for each bottle before starting. Did you use colored foil for the shimmery pink and gold accents?

I really like your placement of the papers, it provides a good balance of colors on each of the bottles and the wire wrapping is a great finishing touch on the golden bottle. I especially like the shaping of the wire, it really adds to the overall effect. I can see how these would easily ‘dress up’ whatever surface they’re placed on. What a lovely first topic for the Home & Garden category!

1 Like

Since paper crafting is my first love, I have a huge stock of scrap papers that makes it easy to arrange color schemes. Yes, I used some foil/metallics. Some of them, especially the fuchsias, are actually salvaged candy/gum wrappers! I scavenge papers from anywhere and anything. Metallic papers can be pulled from the envelope liners of greeting cards that we receive.

That process can be challenging and a reason for procrastination. I decided that for every 5 papers that I glued down I would place one of the darkest colors. Another thing that helps is that you don’t have to glue in a certain direction. Each piece of paper can be glued up, down, left or right in line with what was placed last. This gives a lot of leeway in balancing the colors and sizes of the paper pieces.

It’s really easy. Most important is not to cut a length first. Just wrap and twist with the pliers, wrap and twist while unwinding the wire from the roll. You then won’t end up with a too short piece or extra that you have to clip off. If you precut a piece and it runs short, you could easily join another piece and twist carefully to hide the join.

Thank you for reading and commenting! :yellow_heart: Looking forward to your watercolor(s). Tag me!

2 Likes

Very pretty!

1 Like

These are lovely!! I’m a sucker for a great scrappy patchwork look. The toppers are so interesting too. I especially love the old earring one.

1 Like

I never would’ve thought of saving gum/candy wrappers. What a great idea!

Smart plan! It sounds like you put a good amount of thought into how you’d go about these collages and the forethought definitely paid off with an aesthetically pleasing final product!

I started my first watercolor, but it may be a little bit before I can get back to it. I am determined to make time for it though, so I can finish it - hopefully sooner rather than later!

1 Like

These are lovely! The colour palettes are great, and you’ve clearly put a lot of thought into making them too. And fantastic use of salvaged materials too!

1 Like

You have to be careful about what food wrappers you save. Not only smears of food but odors can attract pests. I rarely bother with cleaning any food-soiled wrappers, like with melted chocolate on them, unless the paper is so outstanding that I can’t pass it up. For gum wrappers and others that touched the food, I wipe with body/cleaning wipes to reduce any smell. I also try to keep them in plastic zip bags.

I know I’ll see a watercolor from you one day. Not thinking about it again until I hear from you. Maybe I’ll see something else that you have on the site or that you post before the painting. Can’t recall if I’ve seem something of yours already. See you around! :gift_heart:

1 Like