
Darts or elastic to shape chin.

HeartfeltHandcrafted has a tutorial on youtube for making a fitted mask that sit under the ears, rather than over them or behind the head. The free pattern is here. It looks like an interesting option for those who really can’t stand anything touching their ears or if that style of tie interferes with their glasses, helmet etc.
The video is really long with a few things I thought could be done differently so I’ve tested it out and made some tweaks. She has the option of darts or elastic for shaping around the chin, I made one of each and will show them both.
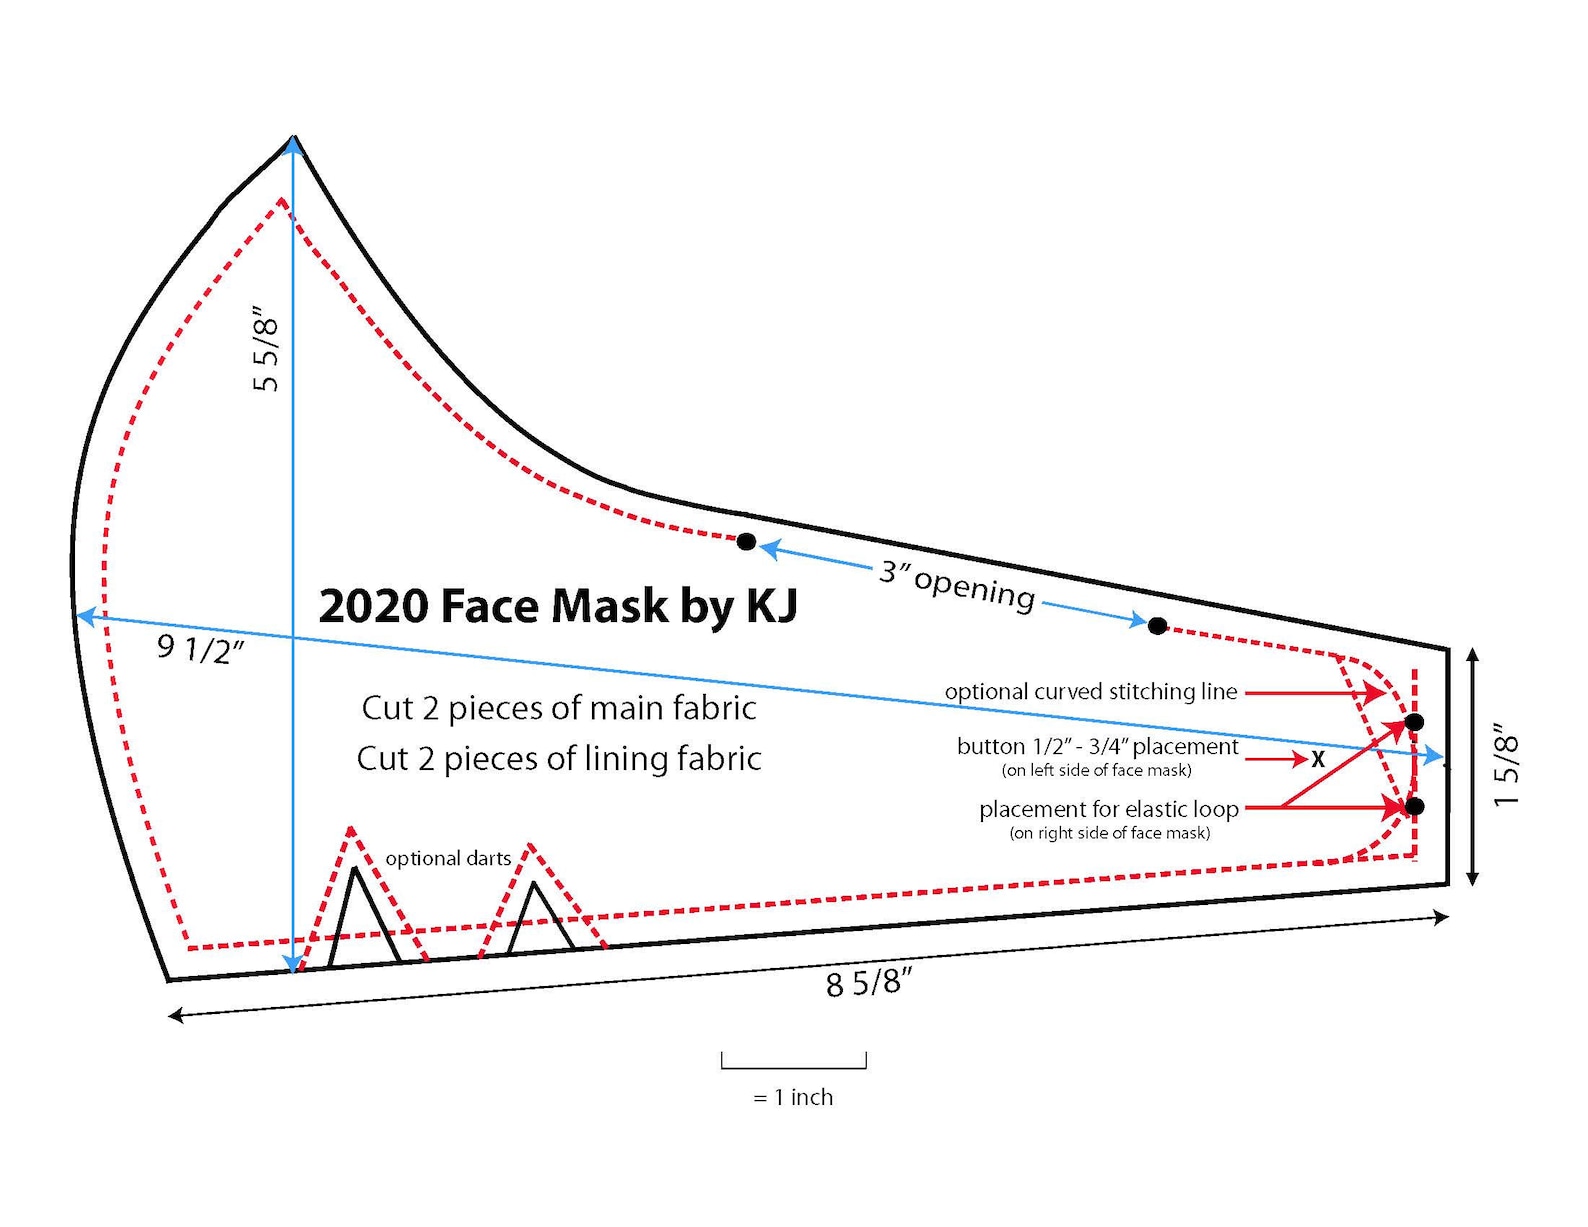
First, trace the pattern onto paper and mark the darts. Cut 4 pieces of fabric (2 front, 2 lining) and cut 2-4 pieces of interfacing if you are using it. I trimmed the interfacing down by 1/4" (that’s her recommended seam allowance) to reduce bulk but it’s optional. Fuse the interfacing to the wrong sides of the fabric (front pieces if only using 2). If you are sewing the darts, mark them.

Place the outside pieces right side together and sew along the curve (1/4" seam allowance), repeat with the lining fabric.
OPTIONAL: Trim the scantest 1/8" seam allowance along the top of the lining fabric as shown to help it fit smoothly inside the mask once assembled.

Snip the curve or trim with pinking shears and press the seam allowances so they will lay on opposite sides of the seam when assembled as shown:

It’s optional but I always edge stitch the centre front seam for a couple of reasons. First, it gives structure and a good finished look and only takes 30 seconds. Second, it helps the seam allowance lay down in the right direction. Last, it shows which side is the front of the mask.
If you are using the darts, sew them now on the front pieces and the lining.

If you sewed the darts, they should also be positioned to lay on opposite sides of each other as shown.

Pin right sides together.

Add a small piece of elastic to one side as shown (I’m using hair elastics)

Sew together using 1/4" seam allowance, back tack over the elastic, and leave a gap open along the bottom edge for turning right side out. Snip curves or trim with pinking shears and turn right side out.

Press seams flat. Insert a nose wire through the opening gap and line it up along the centre top seam, pin into place as shown. The pins are holding the wire firmly against the seam and mark where the wire ends on both sides.

Started just before the turning gap, edge stitch around the entire mask in one continuous line taking care around the curves and backtacking over the elastic. Stop at the edge of the nose wire with the needle in the down position and pivot to take a stitch or two to just the edge of the wire, sew along the bottom of the wire, pivoting again at the end. Continue edge stitching until you meet the place you began and back tack to lock the stitches.

Sew a button on to the end of the side without the elastic.
If you wanted elastic rather than darts to gather the mask at the chin, mark the edge of the dart furthest from centre front. Once the mask is assembled as far as shown, secure the edge of a small piece of elastic to the seam allowance, I zigzag stitched making sure to catch the elastic and that it was firmly in place when tugged on.

At this point I held the mask to my face to judge how long to make the elastic, it will depend on the thickness and stretchiness of whatever you’re using. Once measured, I zigzagged the second end in place.

Turn right side out through the gap and press the seams, taking care not to overheat any elastic. Now, insert the nose wire as shown in the previous mask. Start edge stitching on the top edge of the mask, around the nose wire, around one side, pausing just after the curve. With the needle down, pin the bottom edge with the elastic firmly held up against the seam.

I’m using a small round elastic, it’s squished past my thumb and well out of the way of the edge stitching.

Continue edge stitching stretching the elastic to sew the fabric flat and taking care not to catch it under the needle. I used the same steps as sewing around the nose wire but added a few back tacks over the elastic at both ends to more firmly secure it. That’s the only place the chin elastic is stitched, the rest of it is free moving inside the channel of the edge stitched fabric. Attach the button.

Comfortable with a cycling helmet though it would be a real pain if it started to slip around. Make sure you use a strong nose wire, I’m using 2 plastic covered garbage ties.
