I had this old pattern on my website, but I hated the trouble of having a website, so because it has a Ravelry link I thought I’d post it here! Looking back over it, though, I realize I miss designing patterns and really should do some more…
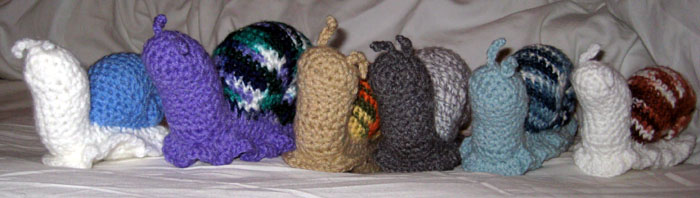
I made a few snails back in the day…
On to the pattern!
Snail Shell:
Row 1: ch 5
Rnd 2: 2 sc in 2nd ch from hook, sc in the next 2 chains, 3 sc in starting chain, sc in the next 2 chains, sc again in first stitch (10 st)
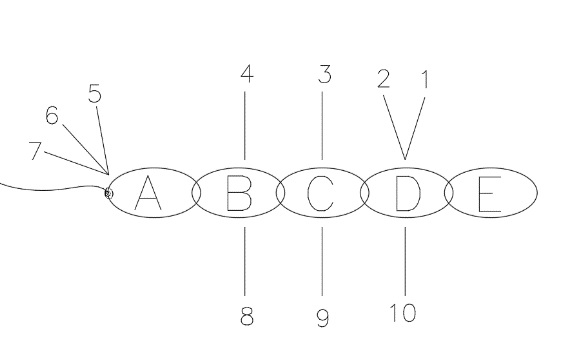
(here you work up one side of the chain and down the other - You chain A, B, C, D, E, then 2 sc in D, sc in C and B, 3 sc in A, then go to the other side and sc in B and C, and put another sc in D. 10 stitches. Then it is worked around as usual.)
Rnd 3: 3 sc in next st, sc in the next 4 st, 3 sc in next st, sc in the next 4 st (14 st)
Rnd 4: sc in the next 2 st, dc in the next 6 st, sc in the next 6 st
Rnd 5: sc around
Rnd 6: sc in the next 2 st, dc in the next 6 st, sc in the next 6 st
Rnd 7: sc in the next st, 3 sc in next st, sc in the next 6 st, 3 sc in next st, sc in the next 5 st (18 st)
Rnd 8: sc in the next 3 st, dc in the next 8 st, sc in the next 7 st
Rnd 9: sc around
Rnd 10: sc in the next 3 st, dc in the next 8 st, sc in the next 7 st
This is where we start working the short rows. If you don’t want to work short rows, and don’t mind more gaps in your shell, you can substitute triple crochet stitches, shown as Row #alt.
Rnd 11: sc in the next 3 st, dc in the next st, sc in the next 6 st, sl st in next st, turn work, sc in the next 6 st, sl st in previous dc, turn, sc in the next 6 st, dc in the next st, sc in the next 7 st
Row 11alt: sc in the next 3 st, dc in the next st, tc in the next 6 st, dc in the next st, sc in the next 7 st
Rnd 12: sc in the next 3 st, dc in the next st, sc in the next 6 st, sl st in next st, turn work, sc in the next 6 st, sl st in previous dc, turn, sc in the next 6 st, dc in the next st, sc in the next 7 st
Row 12alt: sc in the next 3 st, dc in the next st, tc in the next 6 st, dc in the next st, sc in the next 7 st
Rnd 13: sc in the next 2 st, 3 sc in next st, sc in the next 8 st, 3 sc in next st, sc in the next 6 st (22 st)
Rnd 14: sc in the next 3 st, dc in the next 2 st, sc in the next 8 st, sl st in next st, turn work, sc in the next 8 st, sl st in second previous dc, turn, sc in the next 8 st, dc in the next 2 st, sc in the next 7 st
Row 14alt: sc in the next 3 st, dc in the next 2 st, tc in the next 8 st, dc in the next 2 st, sc in the next 7 st
Rnd 15: sc in the next 3 st, dc in the next 2 st, sc in the next 8 st, sl st in next st, turn work, sc in the next 8 st, sl st in second previous dc, turn, sc in the next 8 st, dc in the next 2 st, sc in the next 7 st
Row 15alt: sc in the next 3 st, dc in the next 2 st, tc in the next 8 st, dc in the next 2 st, sc in the next 7 st
Rnd 16: sc in the next 3 st, dc in the next 2 st, sc in the next 8 st, sl st in next st, turn work, sc in the next 8 st, sl st in second previous dc, turn, sc in the next 8 st, dc in the next 2 st, sc in the next 7 st
Row 16alt: sc in the next 3 st, dc in the next 2 st, tc in the next 8 st, dc in the next 2 st, sc in the next 7 st
Rnd 17: sc in the next 3 st, dc in the next 2 st, sc in the next 8 st, sl st in next st, turn work, sc in the next 8 st, sl st in second previous dc, turn, sc in the next 8 st, dc in the next 2 st, sc in the next 7 st
Row 17alt: sc in the next 3 st, dc in the next 2 st, tc in the next 8 st, dc in the next 2 st, sc in the next 7 st
Rnd 18: sc in the next 3 st, 3 sc in next st, sc in the next 10 st, 3 sc in next st, sc in the next 7 st (26 st)
Rnd 19: sc in the next 4 st, dc in the next 2 st, sc in the next 10 st, sl st in next st, turn work, sc in the next 10 st, sl st in second previous dc, turn, sc in the next 10 st, dc in the next 2 st, sc in the next 8 st
Row 19alt: sc in the next 4 st, dc in the next 2 st, tc in the next 10 st, dc in the next 2 st, sc in the next 8 st
Rnd 20: sc in the next 4 st, dc in the next 2 st, sc in the next 10 st, sl st in next st, turn work, sc in the next 10 st, sl st in second previous dc, turn, sc in the next 10 st, dc in the next 2 st, sc in the next 8 st
Row 20alt: sc in the next 4 st, dc in the next 2 st, tc in the next 10 st, dc in the next 2 st, sc in the next 8 st
Rnd 21: sc around, fasten off, leaving long enough tail to sew shell in a spiral and to the body.
Stuff and sewing the shell:
I know, it doesn’t look like anything at this point, other than a lumpy, misshapen blob (picture 1). But the miracle of stuffing and shaping should help that. I don’t really know how to explain this, so hopefully the pictures tell the story better than I could.
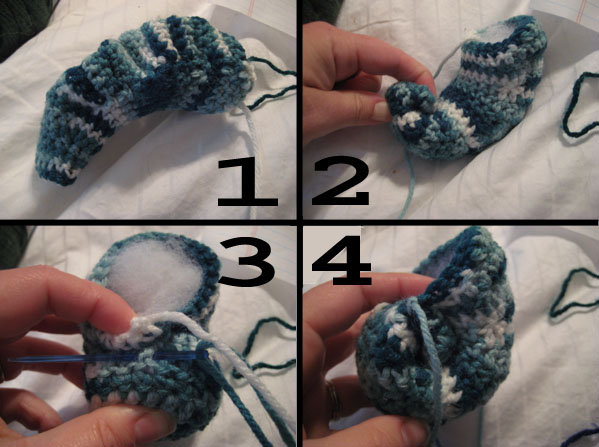
Stuff the shell and, beginning at the closed end, roll the shell up (picture 2). The tail should be positioned at the underside of the shell and you can use that to sew the shell in place (alternatively, depending on your colors, you can use a length of snail-body color to secure the shell). I usually leave out a little bit of stuffing until I’m sewing the shell onto the snail body for ease of sewing. Once I almost have the shell on, I’ll cram as much stuffing as I can into it before closing.
Snail body:
Row 1: ch 5
Rnd 2: 2 sc in 2nd ch from hook, sc in the next 2 chains, 3 sc in starting chain, sc in the next 2 chains, sc again in first stitch (10 st)
(here you work up one side of the chain and down the other - You chain A, B, C, D, E, then 2sc in D, sc in C and B, 3 sc in A, then go to the other side and sc in B and C, and put another sc in D. 10 stitches. See diagram above for starting the snail shell. Then it is worked around as usual. DO NOT JOIN ROUNDS! You’ll see why at Round 9)
Rnd 3: 3 sc in the next st, sc in the next 4 st, 3 sc in the next st, sc in the next 4 st (14 st)
This is where we start working the short rows. If you don’t want to work short rows, and don’t mind more gaps in your snail, you can substitute triple crochet stitches, shown as Row #alt.
Rnd 4: sc in the next st, dc in the next st, sc in the next 6 st, sl st in next st, turn work, sc in the next 6 st, sl st in previous dc, turn, sc in the next 6 st, dc in the next st, sc in the next 5 st
Row 4alt: sc in the next st, dc in the next st, tc in the next 6 st, dc in the next st, sc in the next 5 st
Rnd 5: sc in the next st, dc in the next st, sc in the next 6 st, sl st in next st, turn work, sc in the next 6 st, sl st in previous dc, turn, sc in the next 6 st, dc in the next st, sc in the next 5 st
Row 5alt: sc in the next st, dc in the next st, tc in the next 6 st, dc in the next st, sc in the next 5 st
Rnd 6: sc in the next st, dc in the next st, sc in the next 6 st, sl st in next st, turn work, sc in the next 6 st, sl st in previous dc, turn, sc in the next 6 st, dc in the next st, sc in the next 5 st
Row 6alt: sc in the next st, dc in the next st, tc in the next 6 st, dc in the next st, sc in the next 5 st
Rnd 7: sc around (Begin stuffing now! Once you get to the compound curve it gets harder to work the stuffing up there – continue to stuff as you go from this point on.)
Rnd 8: sc around
Rnd 9: sc in the next st – Remove stitch marker. Then work: sc in the next 7 st, dc in the next st, sc in the next 6 st, sl st in next st, turn work, sc in the next 6 st, sl st in previous dc, turn, sc in the next 6 st, dc in the next st, sc in the next 6 st, place stitch marker (new end of round)
Row 9alt: sc in the next st, remove stitch marker, sc in the next 7 st, dc in the next st, tc in the next 6 st, dc in the next st, sc in the next 6 st, place stitch marker (new end of round)
(You are working 21 stitches - this does not increase the number of stitches around (the body remains a tube of 14 stitches) but moves the starting point of the round to the other side. So round 9 is, in effect, all of round 9 plus half of what would be round 10.)
Rnd 10: dc in the next st, sc in the next 6 st, sl st in next st, turn work, sc in the next 6 st, sl st in previous dc, turn, sc in the next 6 st, dc in the next st, sc in the next 6 st
Row 10alt: dc in the next st, tc in the next 6 st, dc in the next st, sc in the next 6 st
Rnd 11: dc in the next st, sc in the next 6 st, sl st in next st, turn work, sc in the next 6 st, sl st in previous dc, turn, sc in the next 6 st, dc in the next st, sc in the next 6 st
Row 11alt: dc in the next st, tc in the next 6 st, dc in the next st, sc in the next 6 st
Rnd 12: sc around – keep sc around until the snail body is the length you want it. End on the edge of the body, then sc across to close (after cramming in more stuffing). Do not break yarn, work 3 dc in stitches around the base of the body. This creates the ‘fringe’ and makes the snail stand on its own. There isn’t really a row to follow around, you just have to eyeball it. When you’ve gone all the way around, slip stitch in the top of the first dc and fasten off.
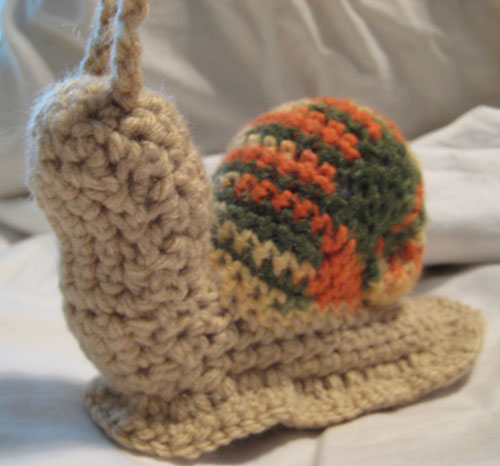
Sew snail shell onto snail body using the leftover tail from the snail shell. There are no hard and fast rules about how to do this, just slap it on there any way you’re most comfortable. Don’t forget to stuff as much stuffing into the shell as you can before you close!
Antennae:
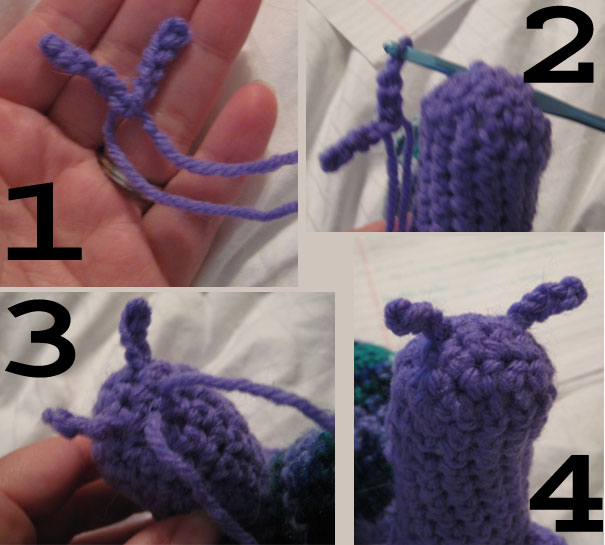
No snail is complete without its feelers. I don’t know how well I can explain this, but I’ll give it a try! Hopefully the pictures will fill in any gaps in my explanation.
Chain 10 and fasten off, leaving a long enough tail at the beginning and end to weave back through 5 of the stitches (picture 1). Weave from the back and front down to the center.
Pull chain through snail head (place wherever you think it looks best - picture 2) and you can use the tail ends to tie the feelers on to a stitch (picture 3). It probably wouldn’t move too much without that, but I like to be safe.